Thursday, April 4, 2024

Unboxing: '85 Afghanistan: Graveyard of Empires (Flying Pig Games)

In February 2015, Mark H. Walker launched a Kickstarter for Old School Tactical, the first game in a new WWII tactical series that is currently sitting at three volumes (with a fourth coming), multiple expansions, and great reviews. He had just recently completed the Kickstarter for Night of Man (a card-driven, science fiction tactical game), which I had backed, but had not yet received (and would not receive until early 2016).

These two Kickstarter campaigns were unique, in that they offered a pledge opportunity I had never seen before- a Maximum Supporter level (Night of Man called it the Awesome Supporter level). For significantly more than the price of the game, you would get a copy of everything Flying Pig Games ever produced (at the time of the Kickstarter, they had not yet produced anything).

During the Night of Man Kickstarter, I was struggling with money, and although I was desperate to get into whatever new games Mark was producing (I was a fan of his designs and products while he was the owner of Lock 'n Load Publishing), I couldn't get enough money together for the big pledge level, and ordered just the game. I was hopeful I would get a second chance though, so put a little aside for the next few months and was ready when that chance arrived again during the Old School Tactical Kickstarter.

Over the years since, I have gotten a lot of great products from Flying Pig Games, and I have done a decent job of keeping up on playing their new releases (although I am now a few games behind, shame on me). Night of Man, I have played and enjoyed. Old School Tactical has been fantastic. The game related to today's (eventual) topic, '65 Squad-level Combat in the Jungles of Vietnam, was a blast. I was incredibly lucky to get the opportunity to back OST when I did.

All of this was a long-winded way to explain how their newest release, '85 Afghanistan: Graveyard of Empires, ended up at my door last week. I watched the Kickstarter with great interest, not only because I knew the game would eventually arrive (thanks Mark!), but because it is a topic I do not have any other games on, and that is a major consideration for me. Also, my friend Bob is interested in the topic, which increases the chances it will get on the table.

Well, let's take a look at what comes inside.

Nice looking box! The subdued colors create a box cover that is distinctive, and although you can see the relationship between this game and '65 Squad-level Combat in the Jungles of Vietnam, the latter's cover seems more vibrant. The rulebook lists the cover artist as Nadir Elfarra. I quite like it.

Here is the back of the box. Not much to say, as we will be going through the components individually.

First up is a stack of cards. The box says there are 69 of them, which are the 58 action cards, and 11 Bonus Victory Point cards. If you have played '65 Squad-level Combat in the Jungles of Vietnam, or Night of Man (which has some similarities), you will know what to expect here.

The cards provide options for your actions on your turn, along with numbers and Hit indicators that are relevant to combat. Some cards will also allow you to trigger special powers that the units may have (for instance, giving them explosive rounds for an action, or to shrug off a point of damage). This game also includes Bonus Victory Condition cards, which can give you additional ways to score Victory Points in scenarios that use them.

Next up, we get the rule and scenario book.

This is a full color book, and looks great! Seems like a number of rules have been clarified, and the Line of Sight rules have had some additions, but nothing looks particularly different from the previous game in the series. Nine scenarios are included (one, a bonus Kickstarter scenario). Only that bonus scenario uses a single map, and there are four 2-map scenarios, three 3-map scenarios, and a single 4-map scenario.

We get a single double-sided Player Aid, with charts on one side, and terrain effects on the back.

We get a single six-sided die. If memory serves, it is only used for targeting rolls for artillery, so it is not something you will need to reach for a lot in any particular game.

A Sequence of Play and general track, which is used at a minimum to count the number of turns. Nice quality, and durable looking.

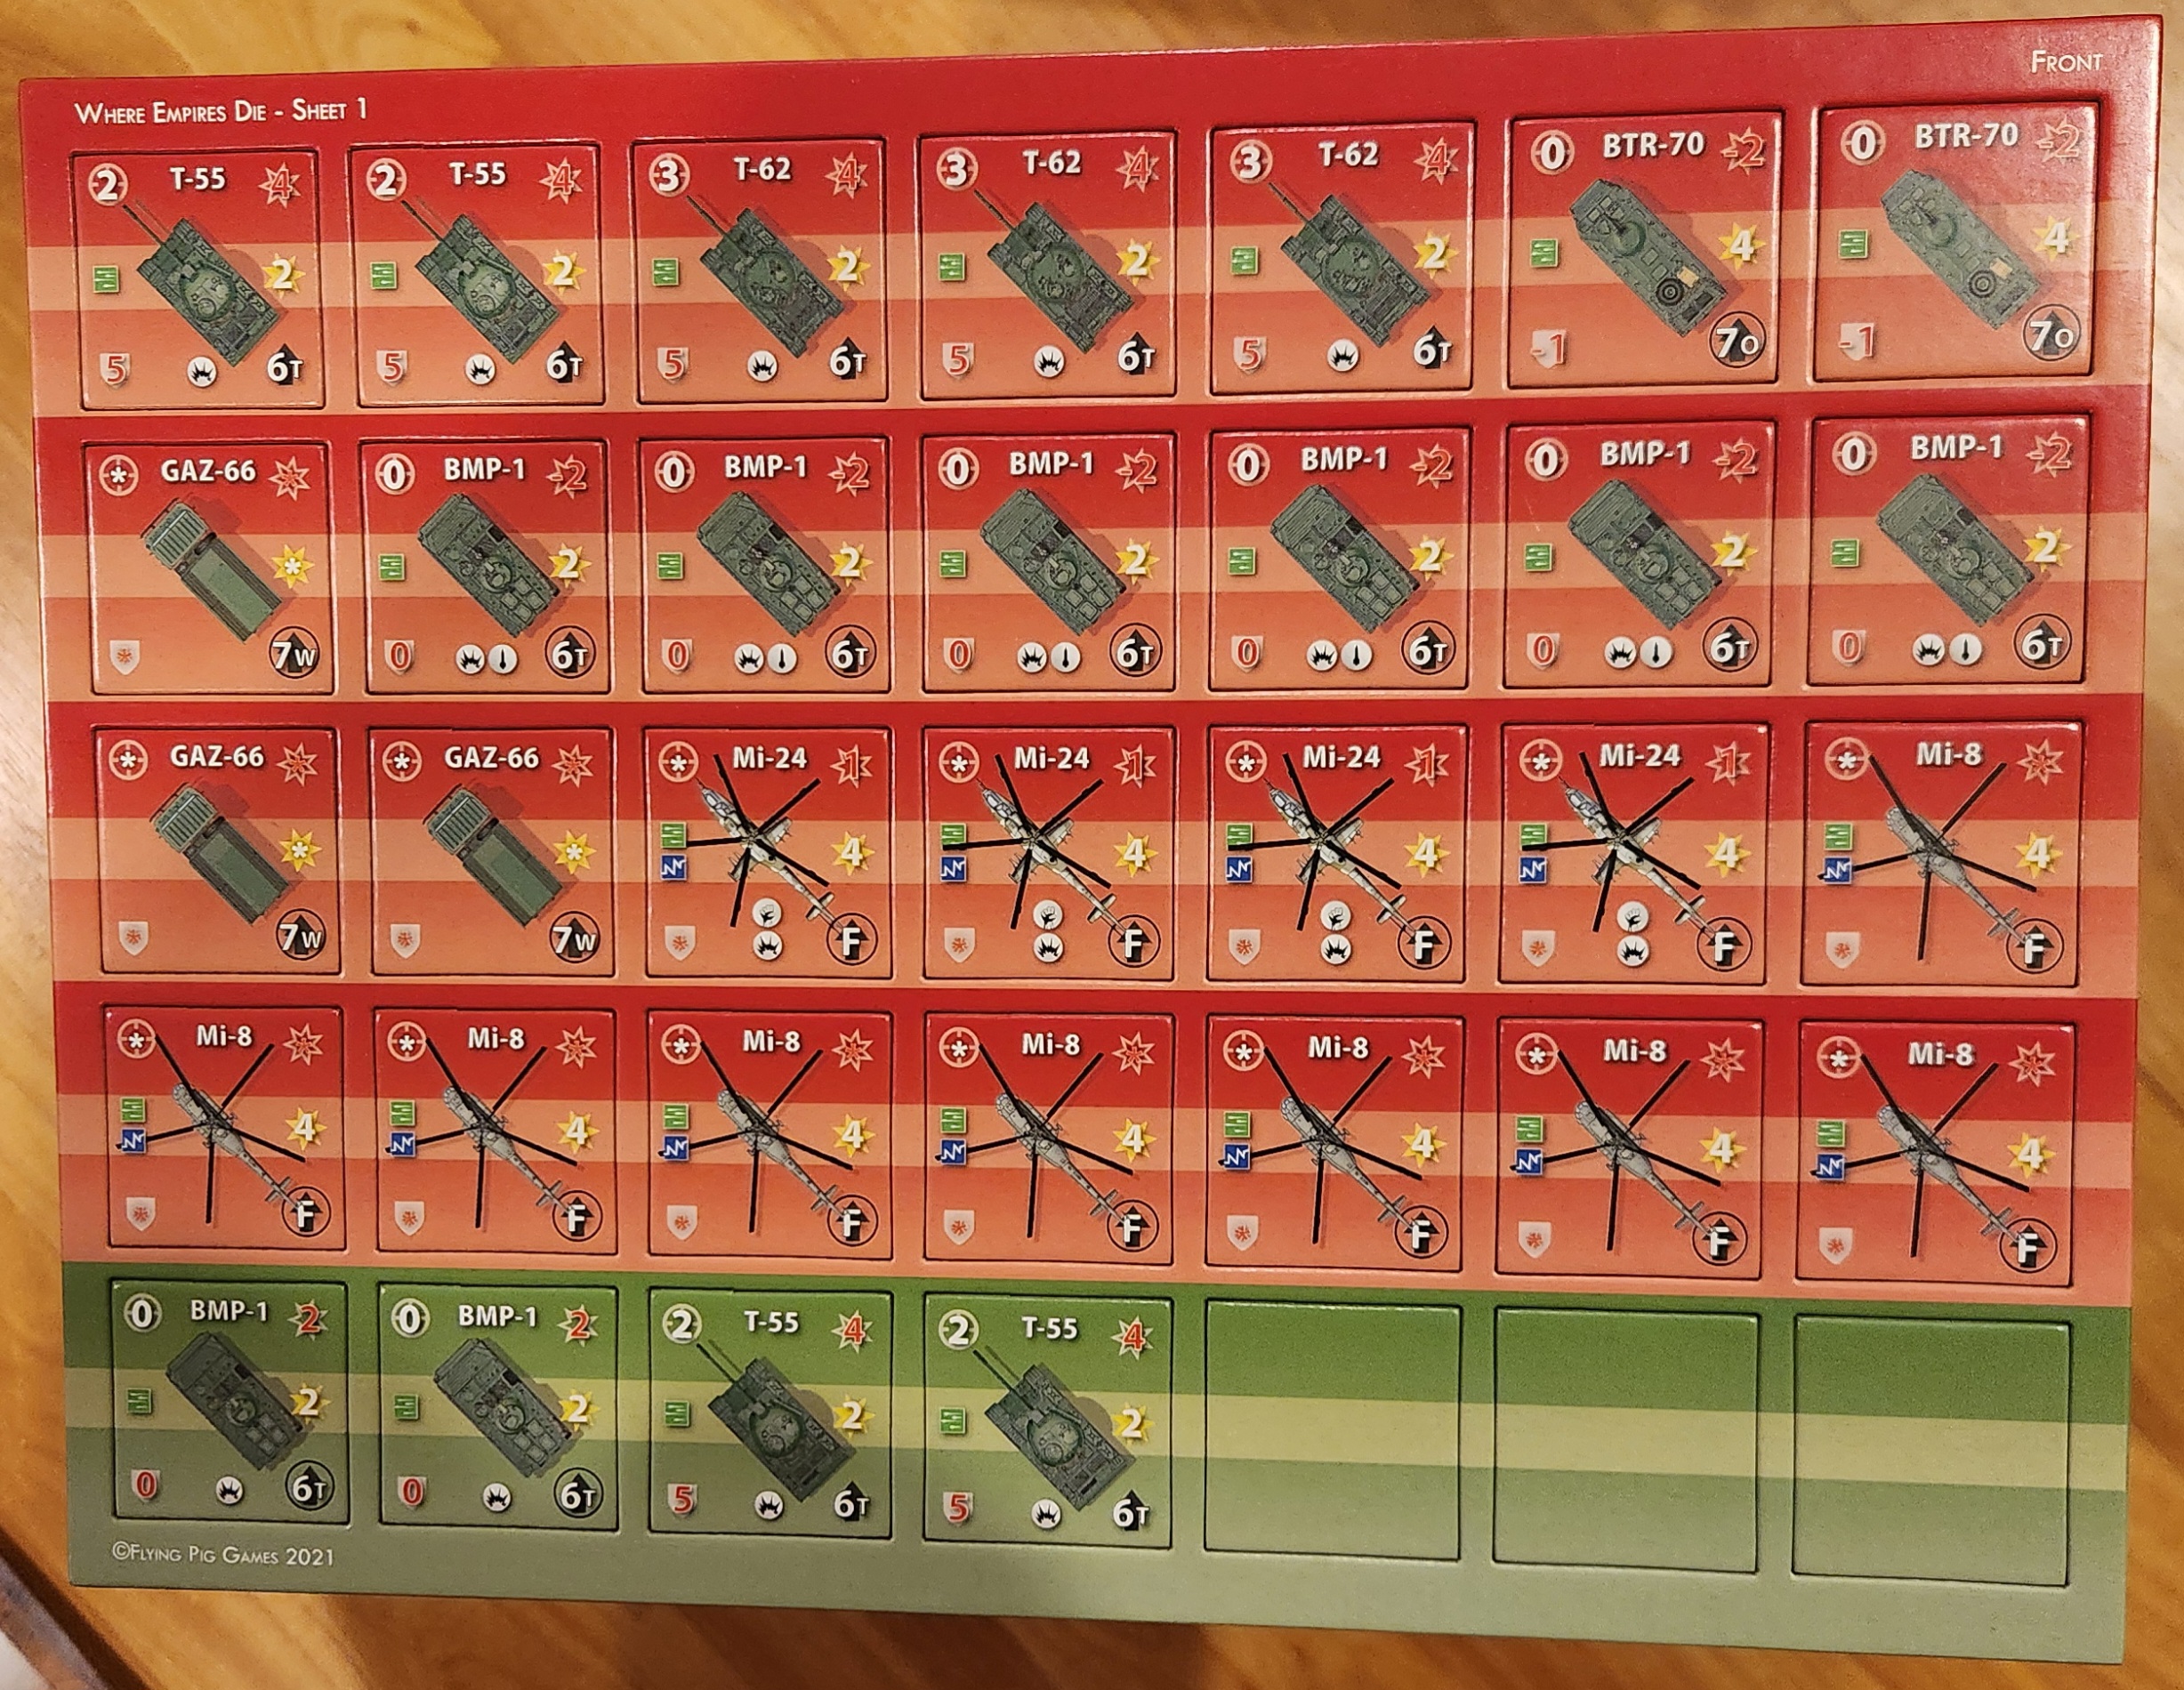
Four countersheets, with quite nice-looking counters. These counters are big, although that may not come across in the photos- the majority are 1" counters, and the vehicles are 1 3/8", which is something I cannot say I have ever seen done before. You are not going to have a tough time handling these, and they are easy to read. What an impressive set of counters!

And finally, we get to the maps. Five are included, numbered 4-8 (the first three in the series are in '65 Squad-level Combat in the Jungles of Vietnam).

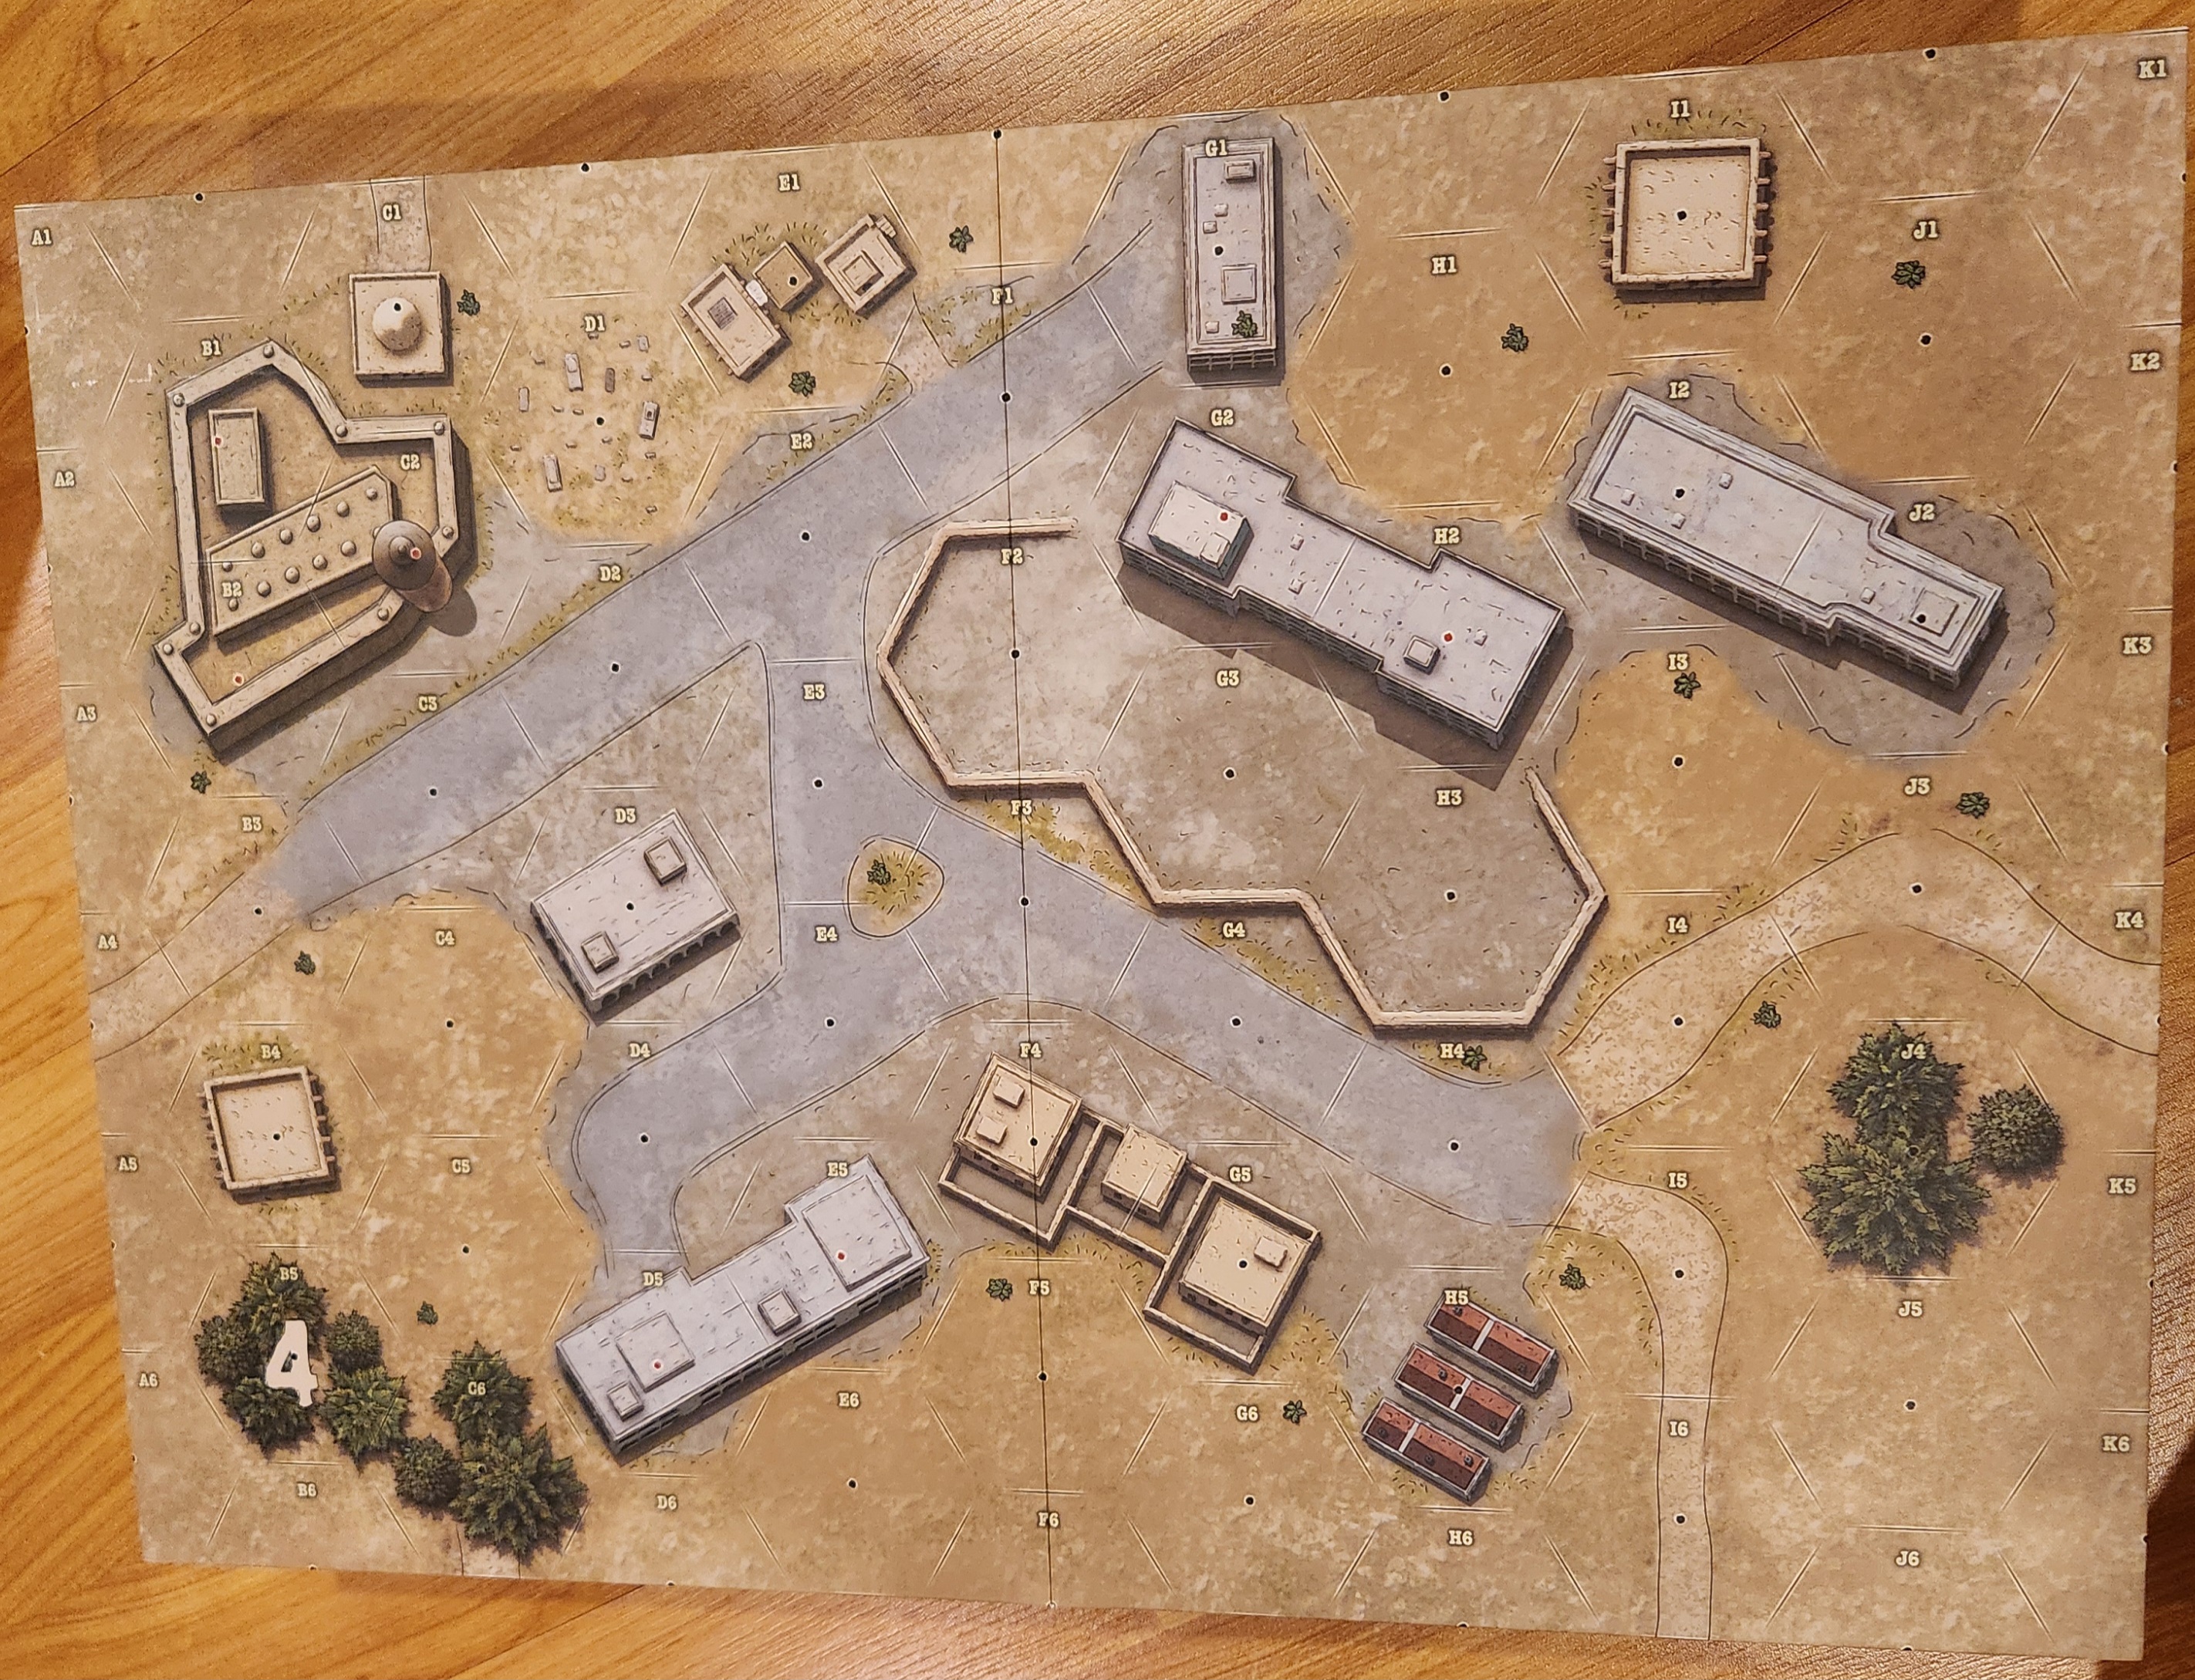
A decent sized town, with considerable cover. Is the walled compound just a building? I don't know, and the terrain chart does not make it immediately clear. Perhaps it says something in the scenario rules.

Cliffs and some buildings, with crops in the north/center part. That little valley on the right there seems like it would be a fun chokepoint for a battle.

A big hill to fight over, with many rough patches to break it up.

A moderately clear board, with scrub and rough sections.

Lots of open space.

One final thing to note- Mark sent a message on a number of channels about overlays that did not get printed but were supposed to be included. They will come at a later date, but he did provide a PDF version of them to give us a way to play the scenarios in the meantime. I have no doubt they will come someday, and I am not worried about them, but it is worth noting they are a required part of the package for most of the scenarios, and I do not yet have them.

And there you have it. Another great-looking product from Flying Pig Games that is sure to be worth your time to check out, and likely to be something I will play before the end of the year.

Tuesday, March 26, 2024

Session Report: Vijayanagara, Part One (Solo - GMT Games)

I have been very excited to get some wargames on the table, and Vijayanagara seemed like a great one to start with, because it looked to play very well solo (it includes solo bots, after all), and because it is about a section of history I basically know nothing about. After reading the background history included, and then reading up on assorted topics related to the game's subject matter, I set it up, and was ready to play.

A brief word about this game, some of which I may have already covered in the recent unboxing article. This is the first game in GMT's Irregular Combat Series, which shares a lot of bones with their COIN series. The game is driven by cards that provide turn order, but taking certain choices makes you ineligible to play the following turn. The provided playbook also provides additional historical information for each card, so I will be using the opportunity, as I play solo, to read up on the history of each card as it comes up.

Game at setup

I decided to play the Bahmani Kingdom (the blue pieces). Per the playbook, the Delhi Sultanate (grey and black) is the most difficult faction to play, followed by the Bahmani, so for my first game, I opted to play the 'mid-difficulty' faction. This also lets me interact with both of the (bot) factions, which will give me insight into how they play effectively- useful for when I manage to play this with friends.

As the Bahmani, I score victory points by adding my Deccan influence (track on the lower left) to the number of forts in play (blue circular pieces on the left) to the total Prosperity of provinces I control (which is zero at the start of the game). I win if I end with more points than the other two factions, only one of which starts with any- the Delhi Sultanate, starting with 18 points (their total will drop as we wrest control of provinces from them).

The first card flip was card #17, Sufi Shaikh Relocates. This card gave me the first choice for the turn, and I opted to take the event, which gives me one additional Deccan influence (bringing me to one victory point) and allows me to remove up to five Delhi Sultanate pieces wherever I have a Bahmani piece. At this point, the only provinces where we co-exist are Madhyadesh and Gujarat, so I remove what I can from there, a total of three pieces.

The Vijayanagara Empire (yellow pieces) gets the next choice, and after flipping through the bot system, chooses Command + Decree, spending down to 0 resources, if possible. The decree chosen is Compel, which adds two Rajas (yellow hexagons) to Gondwana.

Vijayanagara adds two Amirs

Moving further through the flowchart, Vijayanagara elects to Rally using Place Rajas. This ends up putting five more Rajas on the board, at a cost of four resources.

Vijayanagara spreads out

Seeing that makes me feel a little envious- maybe I should have spent my turn putting more pieces on the board, too. Ah well.

Moving on, with most of the choices taken, the Delhi bot elects to do a Limited Command (a command that can only affect a single location) and chooses Govern. They don't have great choices, with no Governors (black hexagons) co-existing with enemy pieces, so instead just place a Qasbah (black circle) in Malwa. This will make their ability to Conscript forces more effective later.

End of first turn

With the Vijayanagara bot and I ineligible the following turn, the Delhi Sultanate gets the only option of playing with the next card, Hindu Kush Mountains (#11). The Delhi bot almost never plays the event, and instead elects to do a Command + Decree, and after going through the selection process, ends up choosing to Collect Tribute as its Decree, generating nine resources, and following up with a Conscript Command in up to six spaces. Going through the selection process, on the handy chart, the Delhi bot adds Troops (grey cubes) to Delhi (five Troops), Andhra (two), Malwa (two), Punjab (one), Gujarat (one), and Tamilakam (one). With that, their turn is complete.

End of second turn

Next card up is Siege of Warangal (#6). The Vijayanagara bot is the first eligible faction listed, and rolls too high to take the event, so elects to do a Command + Decree. The Decree chosen is Build, and a temple is built in Karnataka.

The Command chosen is Migrate, and the bot elects to do it only once, moving three Rajas into Madhyadesh.

I am starting to add visual aids to show exactly what is going on, is that helpful?

As part of this, the Vij bot chooses to shift influence away from Bahmani, and end their turn at 2 VPs, dropping me down to 0.

On my turn, I see that the Event has the Stay Eligible description (meaning, obviously, I can stay eligible on the next card). I elect to take it, which removes the tributary marker in Gondwana, puts two Amirs there, and gives me control (putting me at 1 VP to end the turn).

Next card up is our first Mongol Invasion (Vij control). Even in a three-player game, the Mongols represent a non-player entity that threatens Delhi, and therefore specifically the Delhi Sultanate. Each time this card comes up, either the Bahmani or Vijayanagara player gets to control the Mongol (reddish-brown) pieces for two actions. In this case, Vijayanagara gets control, and elects to Amass twice (this results in six units placed into the Passes, with two of them overflowing into Punjab). If they activate again before Delhi can deal with them, this is going to be quite the blow to the Sultanate.

Next card is Bara Gazi Toph (#30). I have the first choice, and elect to do a Command + Decree, to get some more pieces on the board. My Command is to Rally, adding two pieces apiece into Maharashtra and Gondwana (costing me two resources), and then I use the Decree to build a fort in Gondwana (this gives me a victory point, and makes my units harder to take down in combat). I think I would have preferred to Migrate, in order to spread out, but I felt like more units on the table would give me more options on my next opportunity to play.

The Delhi Sultanate bot chooses the Event, as it is a Stay Eligible event that can change the board state. It provides a free attack (with no counterattack), which they perform in Punjab. They roll a one, two, three, and four, inflicting four hits, more than enough to clear Punjab of Mongol units.

Next card is The Hare and the Hounds (#32). The Vijayanagara bot goes first, and elect to take the event, going up by 1 Deccan influence, then replaces my Amirs in Maharashtra and Gujarat with Rajas, ending up at three total VPs, while remaining eligible for the next card.

The Delhi Sultanate chooses to do a Command + Decree, and elects to Govern, placing Governors (black hexagonal pieces) in Gujarat, Andhra, Tamilakam, and Madhyadesh, following up with the Collect Tribute decree, providing them eight resources and two more cavalry tokens.

Next card up is the second Mongol Invasion card of this Succession period, and it is under my control this time. I first choose to Amass, adding more Mongol cubes onto the board, and then I choose to Attack & Plunder in the Mountain Passes, hoping to remove some Delhi troops from the board, and cut into their resources.

The Mongols roll a five, three, three, and a one on their attack, and the Delhi Sultanate rolls a five and a three. The number of pieces in an area determines if you succeed, so currently, with four pieces in the Mountain Passes, the Mongols only have three successes (and the Sultanate has zero). However, each side has cavalry tokens that can be used to either modify an individual roll down one, or screen (remove) an opposing hit (unless the hit was a one on the dice). The Mongols use their (always present) cavalry token to convert a five to a four, providing four hits, and the Delhi Sultanate use their cavalry token to change a three to a two, resulting in one hit. The pieces are removed on each side, and with three Mongol pieces remaining, the Delhi Sultanate loses three resources to plunder.

Next card is The Raichur Doab (#31), and I am the only eligible player for this one. I choose to do a Command + Decree. My command is to Migrate, moving my pieces around. For the cost of four resources, I move two Amirs from Gondwana to Bengal, one from Madhyadesh to Orissa, and two from Maharashtra to Andhra. I also spend one additional resource to improve my Deccan influence by one (and drop the Vijayanagara's by one). I then choose the Trade decree, gaining six resources and two cavalry tokens. I'm feeling rather good about that turn, at least.

And finally, to end this article, the first Succession card comes up. These three cards come up in a specific order every game, provide an immediate benefit to each player, and help provide a good indication of the time remaining in the game (the game will end within two to eight cards after the third succession card comes up). This first card is the Zenith of the Delhi Sultanate. First thing to note, is that now both the Vijayanagara bot and I can start taking the Rebel command, fighting to take control of provinces from the Delhi Sultanate (the one I have results from an Event card, not a player choice). Then, each faction gets a brief boon:

- The Delhi Sultanate bot gets a free Campaign and moves a bunch of troops and a Governor into Orissa.

- I gain two cavalry tokens.

- The Vijayanagara bot gains two resources.

And with that, the first period of the game is over. The Delhi Sultanate is still clearly in command of the score, but with so many of our pieces on the board, the Vij bot and I are going to start making some noise in the next period, which I will cover in the next post.

Finally, a question for anyone who has read this far (and thank you!) - I started trying to provide some graphics in the image to show what was going on. Was that helpful? Distracting? Please let me know, so I can decide how best to present things in the next article. I realize that without knowing the game, a lot of the images will appear to be mostly a shape/color soup, of sorts, but presumably, people with some familiarity with the game will be able to more easily follow along (I know I could, if I read this again in the future).

Thursday, March 21, 2024

Road to the Bokur Brawl, Part 2

As I mentioned in my previous post, I have a schedule to get an army done in time for next year's Bokur Brawl.  My first checkpoint was yesterday, and I mostly managed to stay on target.  There were three parts to the goal yesterday- pull out all my relevant models, verify what I own, and decided on a color scheme.

Pulling out all my models involved going through everything I owned- a larger task than might be immediately obvious.  I used the time to finally get all of my unassembled Warmachine models in place, which will make future projects easier.  This was a considerable amount of work and time... but I managed to get it done.

Seven 30-gallon tubs of storage later, all of my unassembled Warmachine models are in one place, aside from the Devourer's Host models, which are now in a single location.

I have not yet verified my inventory is what I expected, but that's one that I can do over the next week, as I assemble and start painting my 30 point army.

Speaking of, I decided to stick with a fairly standard color scheme for these guys.  I'll probably have some small variation to match my personal taste as I work through them, but the green/brown color combination is not something I've actually painted before, and should be easy enough to allow me to stick to the schedule, so that's what I'm going with.

That's it for now- I have a lot of work to do between now and May, but I will likely post at least one progress picture to show how things are coming along between now and then.

Thanks for reading!

Thursday, March 14, 2024

Unboxing: Rebel Fury (GMT Games)

Coming home yesterday, I was excited to see yet another package from GMT, with this month's releases that I had ordered: France '40 2nd Edition (with mounted map), and Rebel Fury. Both of these appeal to me for different reasons, but we'll talk about the France game another time.

Rebel Fury, designed by Mark Herman, is a game covering six battles of the American Civil War: Chickamauga, Chattanooga, Chancellorsville, Fredericksburg, Spotsylvania, and The Wilderness. Despite my love of history, I admit my knowledge of the ACW is not particularly great. Having a game that covers the battles gives me a way to learn about them in an enjoyable way. This game in particular is interesting because the system is based on the well-regarded Gettysburg game from c3i issue 32, which is fairly low complexity, and also seems pretty light on counter density (the battles here look to have 50ish counters on the board at a time? Quite light).

The game box looks sharp, and has that traditional GMT look that I haven't seen for a few releases. Of note is that this is Volume 1 of a series, and Mark Herman has already been showing some pictures of progress on the next volume on Twitter/X.

Here we have the back of the box. It has a listed complexity of three, which fits with what I have heard about the Gettysburg game. The Solitaire Suitability of five indicates that there isn't a solo system included, but I should mention there is a solitaire scenario (Fredericksburg), and my brief read of the rules does not show anything that would prohibit good solitaire games.

First item when you open the box is the dice, two standard ten-sided dice... and this unique six-sided dice.

That's different. The rules mention it only briefly, in applying in some cases to the Defender in combat, with its interpretation shown on the Attack Results Table in the Player Aid Charts (shown later on).

Next up is the Playbook, with rules on how to set up and play the scenarios. One thing I found a little disappointing was the lack of historical blurb before each scenario- these brief descriptions of the events and context of the battle are items I find extremely enjoyable in wargames (for instance, I love reading these in the Great Battles of History and Men of Iron games). Sure, I can just, I don't know, read about the battle in Wikipedia. But I really wish there was something included. Anyway, very small complaint.

And here is the rulebook, full color, and very nice. You can read it here.

Next up, two identical Player Aid Cards, with some rules summaries and charts on the front, and terrain rules on the back. Nice quality, and not too crowded.

A game tracking card, with unique turn tracks for each scenario. I believe Artillery Points are also tracked here, although it is not listed on this card.

Here we have an off-map movement display for the Fredericksburg and Chancellorsville scenarios. For the former, it operates as a holding box for reinforcements, essentially. For the latter, it provides options for reinforcement arrival locations (the letters in hexagons correspond to locations on the play maps). Rules for this are included in the main rulebook, with a mention that only Union troops use them in Volume I, so it seems likely we will see this method used in future volumes. A really cool way to handle this.

Game comes with two countersheets, using blue for the Union troops, and grey for the Confederate troops. The reverse side of these counters show the unit in battle formation (versus the maneuver formation shown above). Each game uses its own unique set of unit counters, and you can tell which scenario the counter is for by the white circled letter on the top left of the counter. HQs likewise have a maneuver and battle side to their counters. Given the counter inventory (note the three time counters...), you apparently are able to play three scenarios simultaneously, one on each of the maps, assuming you have Player Aid Cards and game tracking cards for everyone. That's a cool concept, certainly, and given that these units are not shared between scenarios, reinforces that indeed, these games will have low counter densities.


Each map has two scenarios that can be played on it, listed in one of the bottom corners. These maps are beautiful- if I may, let me show you a close-up of one of them:

There are tons of detail, and they look very interesting to play on. The map art was done by Charles Kibler, and I have to say, I quite like it.

And there you have it. A nice product, with a good variety of scenarios using a well-regarded system. Another great game from GMT, and one that I *think* I can get on the table before summer. I'll let you know when I do :).

Wednesday, March 6, 2024

Road to the Bokur Brawl (Circle Orboros/Devourer's Host)

Starting to get all my minis together

My goal is to play in the Bokur Brawl in 2025 (usually in April). I have never gone to a Warmachine tournament, nor a miniatures game convention, but I'm determined to get more involved in the Warmachine community, and to make this happen I thought it might be motivating to actually blog about my goals and progress!

I am going to bring Devourer's Host to this event. I spent a bit of time trying to figure out which army I would focus on to make this happen. I have a large number of miniatures assembled and ready to play, but I'd really like to have something painted going into a major event like this, so I chose an army that I felt confident I could paint in time (I like drybrushing, and there's a lot of fur), and it was the first army in the app where this would be true (heck, it's the first army in the app).

So, with that decided, let me go through what I think I have, and see what I think I need to purchase, and finally, put out a plan for how I'll get it all done.

Warlocks:

There are four warlocks in this army:

  • Iona the Unseen
  • Kromac, Champion of the Wurm
  • Tanith the Feral Song
  • Wurmwood, Tree of Fate

I believe I own all four.  It seems like Tanith is not particularly popular, and it also seems like Iona and Kromac are a bit more straightforward, so I think I'll focus on getting those two playable and work on my familiarity with them, but maybe I'll try the other two at some point in order to see if one calls to me.

Warbeasts:

  • Argus Moonhound - own 1
  • Feral Warpwolf - own 3
  • Ghetorix - own 1
  • Gnarlhorn Satyr - own 1
  • Gorax Rager - own 4
  • Loki - own 0
  • Pureblood Warpwolf - own 2
  • Razorwing Griffon - own 0
  • Rip Horn Satyr - own 0
  • Rotterhorn Griffon - own 1
  • Scarsfell Griffon - own 1
  • Shadowhorn Satyr - own 1
  • Storm Raptor - own 1
  • Warpwolf Stalker - own 1
  • Wild Argus - own 4
  • Winter Argus - own 1

I also own a Gnarlhorn/Rip Horn/Shadowhorn Satyr box I haven't opened, and may try to magnetize.

I have a good mixture of beasts.  I definitely need to pick up Loki at some point, and I could probably stand to grab a second Warpwolf Stalker and Storm Raptor, but they can wait until I have enough plays to actually figure out whether or not I'll end up getting them.

Structures:

  • Well of Orboros - own 0

This is probably something I'll get at some point, as well.  Maybe not a must-have, but I'll try to proxy it in a game to see how I feel about it, first.

Solos:

  • Bloodweaver Night Witch - have 0
  • Gallows Grove - have 2
  • Kogan the Exile - have 1
  • Lord of the Feast - have 1
  • Tharn Blood Shaman - have 1
  • Tharn Ravager Shaman - have 1
  • Tharn Ravager White Mane - have 1
  • Tharn Wolf Rider Champion - have 2

Again, good coverage.  I definitely need at least one Night Witch.  I may pick up a second Tharn Ravager Shaman, too.  I'll note that Magnus the Unstoppable is allowed in the army, but I don't think he provides anything I need, and I don't see any ways to buff him, so I'm not concerned about him here.

Units:

  • Brighid & Caul - have 1
  • Tharn Blood Pack - have 2
  • Tharn Bloodtrackers - have 2 (and have Nuala the Huntress)
  • Tharn Bloodweavers - have 2 (and have 1 Tharn Bloodweaver Haruspex)
  • Tharn Ravagers - have 2 (and have 2 Tharn Ravager Chieftains)
  • Tharn Wolf Riders - have 1

Great coverage here, too.  I *may* want to figure out a solution to getting a second unit of Wolf Riders, but I may just buy and convert from a Champion.  We'll see.

So, by my count, I own all four warlocks, and 366 points at the time of this writing.  Plenty to get started with.

Here's my plan, then.  In the next two weeks, I'll pull out all of my relevant models, and verify that what I think I have matches what I actually have (starting this process revealed I own two units of Blood Pack, for instance).  I'll use the time to settle on a color scheme, as well.  That means I'll have this piece done by March 20th.

By the end of May, I'll have a 30 point Recon list built and painted.  I'm currently thinking something like this:

  • Kromac, Champion of the Wurm
  • - Feral Warpwolf
  • - Ghetorix
  • Gallows Grove

All of these models will be useful at later point levels, so seem like a perfect place to start.

By the end of July, I'll have a 50 point list painted, with Iona.

By the end of September, I'll have a 75 point list painted, along with Wurmwood.

By the end of November, I'll have at least one 100 point list painted, along with Tanith.

And by the end of next January, I'll have the second 100 point list painted (there should be plenty of overlap between the two 100 point lists, so this shouldn't be too horrible a task.

Early January will see a balance update for the game, which may require some changes, but I'll have a bit over three months to figure that out, and get what I need painted.

In addition to this, I'll try to make sure I start getting games in. I build pretty fast, so I should be able to play full games well before I get them painted.

Anyway, look forward to updating you all along the way.